Serialization and .NET framework

 Sagareshwar Sanctuary, Photo By Abhishesk kadam

Moving ahead from unit testing aspects lets go through serialization and scenarios where we need to use this.  Of course implementation wise we will see what is supported in .NET framework and its C# implementation.

What is Serialization??

In computer science term serialization usually refers to persisting state of object.

According to Wikipedia page

“In computer science, in the context of data storage and transmission, serialization is the process of converting a data structure or object into a sequence of bits so that it can be stored in a file or memory buffer, or transmitted across a network connection link to be "resurrected" later in the same or another computer environment.[1]

When the resulting series of bits is reread according to the serialization format, it can be used to create a semantically identical clone of the original object. For many complex objects, such as those that make extensive use of references, this process is not straightforward.

This process of serializing an object is also called deflating or marshalling an object.[2] The opposite operation, extracting a data structure from a series of bytes, is deserialization (which is also called inflating or unmarshalling). “

Ways of Serialization in .NET

Simplest way of serialization is to mark the class with the Serializable attribute.

 [Serializable]
 public class SaveScores {
        public int Score = 0;
        public int Wickets = 0;
        public String PlayerName = String.Empty;
 }
IFormatter FormatData = new BinaryFormatter();
Stream SaveStream = new FileStream("SaveScores.Txt", 
                                    FileMode.Create, 
                                    FileAccess.Write, FileShare.None);
formatter.Serialize(SaveStream, FormatData);
SaveStream.Close();
We can also have selective serialization. For this we need to use 
NonSerialized attribute with the fields we do not want to consider 
for serialization.
[Serializable]
public class SaveScores{
  public int Score;
  [NonSerialized] public int Wickets;
  public String PlayerName=String.Empty;
}
Having seen this basic way of serializing a object, in coming posts 
I will talk about other important aspects of Serialization which are 
  1. Versioning.
  2. Custom Serialization.
  3. Concepts behind Serialization.
  4. Resources and Useful links for Serialization.

Till then .. Keep Reading, Keep Coding ..

 
Tagged , ,

Visual Studio Team System – Test Edition


Oh Yeah ! It was big gap between last post and this one.

May be I was looking for this snap !!

flower


Continuing with my earlier posts I would like to write about two more tests available in visual studio

Ordered Tests

Web Tests

In previous post we saw various aspects of unit test and related features.

One of the key things to understand is while running the unit tests deployed for project in ordered manner is very important. This is required for building a scenario by running tests in specific sequence or this ordering might be important from a view that we have to run unit tests specific to certain section of our program.

How to Run Ordered Tests gives detailed insight on aspects related to ordered tests. This option for ordered test is available in developer edition as well as test edition.

Another important aspect related to testing of web based applications is web tests provided in visual studio test edition.

With help of web tests we can record various actions taken by user related to web application. This recorded actions include http request and responses, request status code time required for these requests.

Web Test Engine takes care of lots of things such as Extraction rules, validation rules, authentication, handling of cookies etc.

In addition to this features web tests can be connected to data sources like .csv files or excel files using the database providers so that post parameters covered in the recording can be connected to data for making these tests data driven.

Web tests play specific role to identify what changes have been made to UI or it can be used as a effective script tool which can easily populate the system to be deployed on client.

Two most important resources on web tests are

Amit Chatterjee’s Blog – A must read page for web tests

Working with web tests – MSDN page for web tests.

I hope this sounds interesting and useful to all of you.

Keep coming, keep reading ..

Unit Testing – Twists and Twirls ( Part 2)

@Kumbharlee Ghat

Let see some action now and jump into how to test simple function residing in a class.

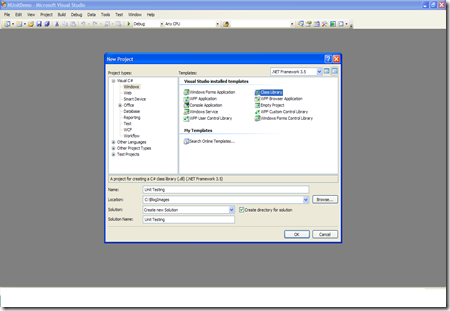
For this we start with creating a simple class library in C# using Visual Studio 2008.

CreatingClassLibrary

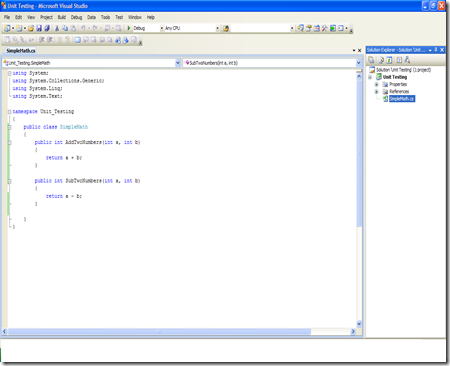
Lets proceed with putting some simple code snippet which provides us simple arithmetic operations.

Simplefunctions

Lets proceed with adding unit test project for this class library which will contain two unit test methods.

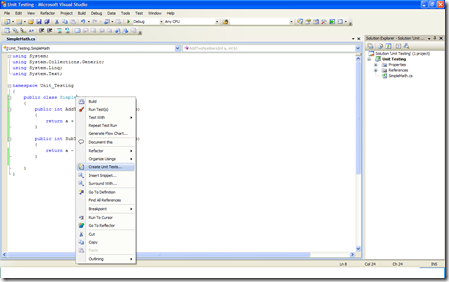
For this we right click on class name and click on choice “Create Unit Tests… “.

CreateUnitTests

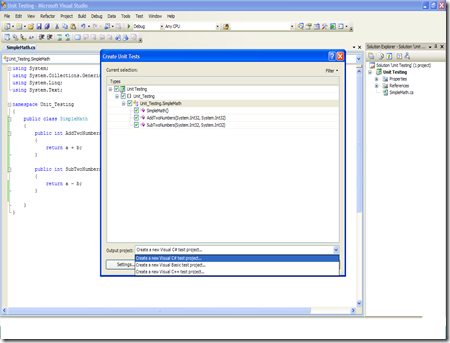
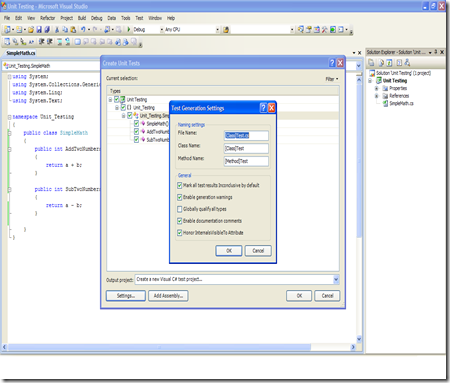
Following dialog is then displayed for user which allows some settings to be made as per user’s preferences.

TestPreference

Here we select class and both the methods inside class so that Unit Tests will be created for them.

Output project type is C# test project which user can select as per preference.

Additionally clicking “settings” button will open Test Generation Settings dialog which will allow to set Naming Settings as well as General settings.

TestGenerationSetting

There are five choices displayed for user under general settings.

  • Mark all test results inconclusive by default
  • Enable generation warnings
  • Globally Qualify all types
  • Enable documentation comments
  • Honor InternalsVisibleTo Attribute.

There you go ! Last one needs to be paid attention to ..

For time being lets proceed with our unit tests for AddTwoNumbers and SubTwoNumbers methods.

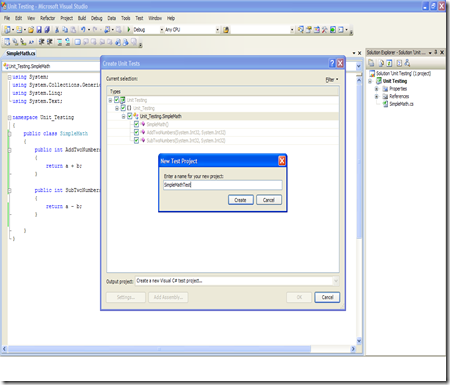
Once we click ok user is prompted for name of the Test project.

nameProject

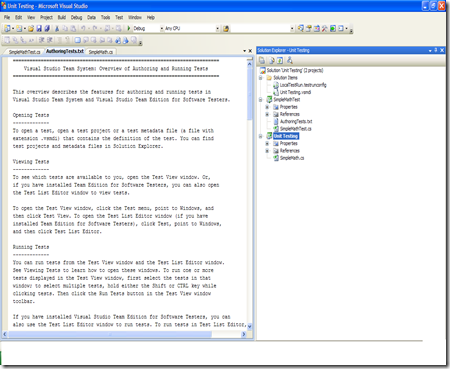
Clicking of Create button will add Test project to the solution.

CreatedProject

If we closely observe few things added newly in the project

  • LocalTestRun.testrunconfig file
  • Unit Testing.vsmdi file
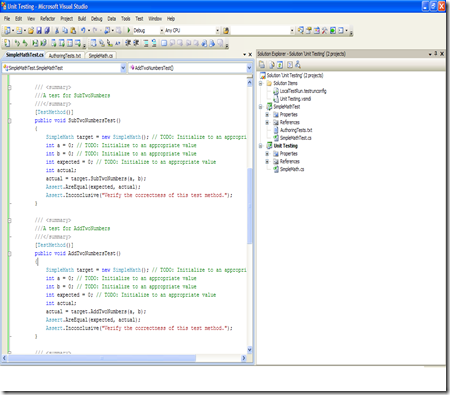
  • SimpleMathTest project which contains SimpleMathTest.cs file.

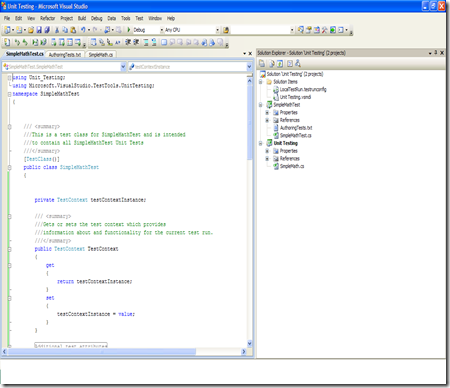
Lets see what all contents we have inside SimpleMathTest.cs file.

TestContext

Object of TextContext class called testContextInstance.

get; set; for TextContext which provides information about and functionality for the current test run.

Next to this we have two test methods

SubTwoNumbersTest()

AddTwoNumbersTest()

TestMethods

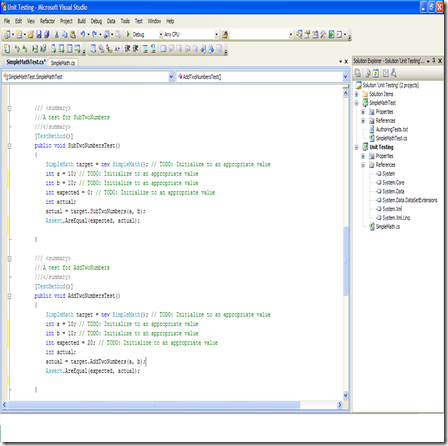
we modify the values for “a” and “b” variables so as to check whether the actual and expected results match or not.

Changes made will look like this

ExpectedActual

What we re trying to judge here is after passing a as 10 and b as 10 , whether addition is returned as 20 and subtraction as 0.

But question remains.. How do I test this ?? Lets check it out…

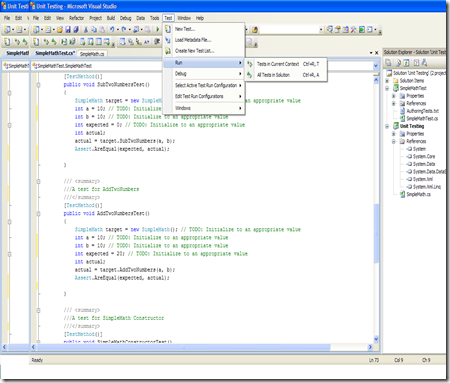
RuntTestCase

As shown in the image, if we click on Test->Run we find two options

  • Test in current context
  • All Tests in solution

We select option Test in Current context. Another way to run Test in current context is Pressing Ctrl+R, T directly which will execute currently selected test case.

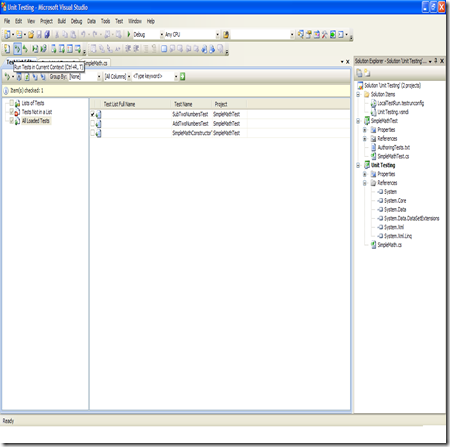
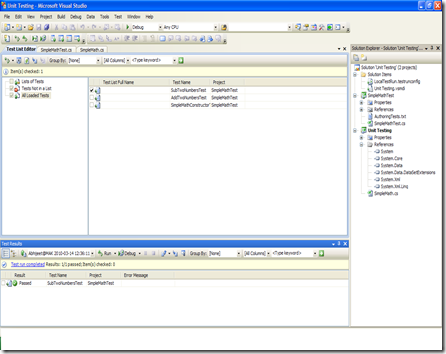
Another simplest way is to  click on vsmdi file which will open up Test List Editor listing all the test cases. We can also use toolbar items to run the tests in current context or all tests in solution.

vsmdi

After clicking on Run Test in current context what we get is as follows

RunTestUsingVsmdi

What we see here in bottom as test is passed. Since we passed 10,10 as two input values and 20 as expected result; both values matched and test case is marked as successful(passed).

Whether to check what happens when actual and expected values do not match lets try out changing the values and this time we do it in SubTwoNumbersTest.

We change the value of b as 20 but still expected result is 0 and this is not going to match with actual value.

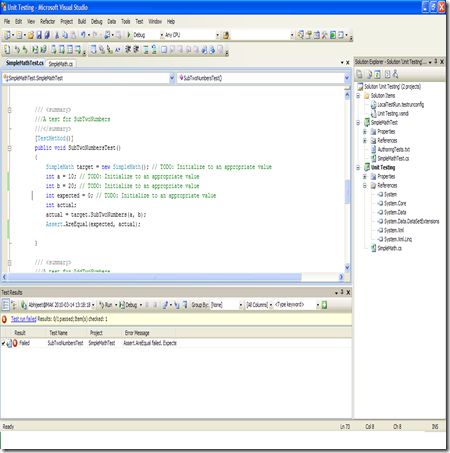
This time we will run the test case by using option ctrl+R, T

The failed test case result will look like

FailedTestCase

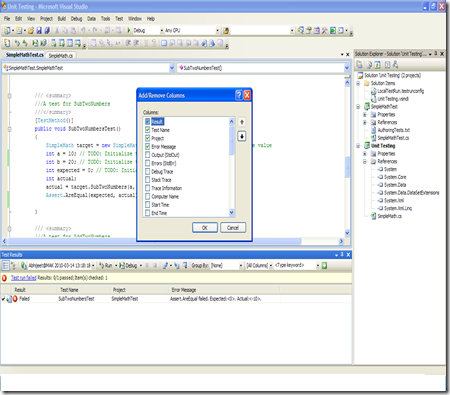
We can also add columns to Test Results by right clicking first column header as per our preference.

AddColumns

So far we have used Asser.Equal to compare actual and expected result. But Assert class provides us various methods which can be used to  conduct a test case. All the details for this methods can be found here.

Before we conclude lets quickly summarize what we have seen in this post

  1. How to add a unit test project
  2. Details of unit test project and how test functions are added.
  3. How to run test cases and ways to run test cases
  4. Details of  Assert class and methods residing under it

In coming post we will see how “Honor Internals Visible To “ attribute is used and what happens with methods with different scope like private, internal and private static etc.

Please do write me about your feedback or queries  which I am expecting the most , so that this articles can be made better and better !

Unit Testing – Twists and Twirls

@Sayaji,Pune

In my previous posts , we saw some of the interesting scenarios in Interoperability. Having covered this area lets check out some of the “must know “ aspects and areas under Unit Testing.

Frequently Used Terminologies

Test Driven Development :

Test-driven development (TDD) is an advanced technique of using automated unit tests to drive the design of software and force decoupling of dependencies. The result of using this practice is a comprehensive suite of unit tests that can be run at any time to provide feedback that the software is still working. This technique is heavily emphasized by those using Agile development methodologies.

click here for detailed information.

Unit Testing:

The primary goal of unit testing is to take the smallest piece of testable software in the application, isolate it from the remainder of the code, and determine whether it behaves exactly as you expect. Each unit is tested separately before integrating them into modules to test the interfaces between modules. Unit testing has proven its value in that a large percentage of defects are identified during its use.

The most common approach to unit testing requires drivers and stubs to be written. The driver simulates a calling unit and the stub simulates a called unit. The investment of developer time in this activity sometimes results in demoting unit testing to a lower level of priority and that is almost always a mistake. Even though the drivers and stubs cost time and money, unit testing provides some undeniable advantages. It allows for automation of the testing process, reduces difficulties of discovering errors contained in more complex pieces of the application, and test coverage is often enhanced because attention is given to each unit.

MSDN info gives detailed insight on this.

Test Scenarios:

Test scenarios represent a powerful tool for test development. In general scenario defines an own model of target system, called the testing model. Scenario must define the state class for this model and the transitions, which must be described in terms of target methods

Test Cases:

A test case in software engineering is a set of conditions or variables under which a tester will determine whether an application or software system is working correctly or not. The mechanism for determining whether a software program or system has passed or failed such a test is known as a test oracle. In some settings, an oracle could be a requirement or use case, while in others it could be a heuristic. It may take many test cases to determine that a software program or system is functioning correctly. Test cases are often referred to as test scripts, particularly when written. Written test cases are usually collected into test suites.

More info on this Wiki page.

Code Coverage:

Code coverage is a measure used in software testing. It describes the degree to which the source code of a program has been tested. It is a form of testing that inspects the code directly and is therefore a form of white box testing. In time, the use of code coverage has been extended to the field of digital hardware, the contemporary design methodology of which relies on hardware description language(HDLs).

Code coverage techniques were amongst the first techniques invented for systematic software testing.

Detailed info is here.

Test Frameworks:

Unit testing frameworks, which help simplify the process of unit testing, have been developed for a wide variety of languages as detailed in this list of unit testing frameworks. It is generally possible to perform unit testing without the support of specific framework by writing client code that exercises the units under test and uses assertions, exception handling or other control flow mechanisms to signal failure. This approach is valuable in that there is a barrier to entry for the adoption of unit testing; having scant unit tests is hardly better than having none at all, whereas once a framework is in place, adding unit tests becomes relatively easy.

Detailed list of unit testing framework is worth having look at.

Okay ! Enough of theory .. isn’t it ??

We talked about Twists and Twirls .. where are they ???

We will be coming across them from next post as we go ahead and see the actual examples.  Getting used to this terminologies is really important and we will need them as we see various aspects of Unit Testing.

Till then .. Have a Nice One 🙂

Interops: .NET and Mono

@Corbett National Park,Photo by Ajey godbole

Ever wondered a scenario where you want to develop a cross platform .NET application ?

What kind of framework is required for this kind of applications ??

Well lets discuss!

Mono software platform allows developers to create cross platform applications which is an open source implementation of Microsoft’s .NET framework based on ECMA standards.

Main components of Mono

1) C# compiler for compiling C# 1.0 and C# 2.0 features and  additionally many of the C# 3.0 features.

2) Mono runtime which implements Common Language Infrastructure (CLI) , Just-In-Time (JIT) compiler, Ahead-of-Time (AOT) compiler, a library loader, the garbage collector, threading system and interoperability functionality.

3)Base Class Library which provides comprehensive set of classes for building applications.

4) Mono Class Library provides additional classes  for Gtk+, Zip files,LDAP,OpenGL etc.

The whole advantage of this Mono framework is , it provides a framework for user for Cross Platform development which is varied on Linux, Microsoft Windows, Mac OS X, BSD, and Sun Solaris, Nintendo Wii, Sony PlayStation 3, Apple iPhone and many others with a additional advantage that developer is already used to .NET framework and programming language such as C#, VB.NET and Eiffel etc. Scripting and Embedding can also be used for various purposes.

This Wiki Page gives detailed information about Mono framework  and its extensions.

As given on Wikipedia Several projects extend Mono such as


Updates and Resources

Mono 2.6.1  is now available.

There are various forums and blogs which discuss latest updates about Mono which can be accessed here.

Mono Tools for visual studio is available for download with 30 day trial.

.NET <-> Java Interoperability


Jugaad,Photo by Ajey godbole


As we have been discussing this earlier necessity of Interoperability arises in various cases such as

  1. Reuse of existing systems
  2. Proof of concepts
  3. Migration
  4. To maintain lower project costs by using existing legacy apps.

Considering above key points, lets check out some of the important aspects related to .NET and Java Interoperability.

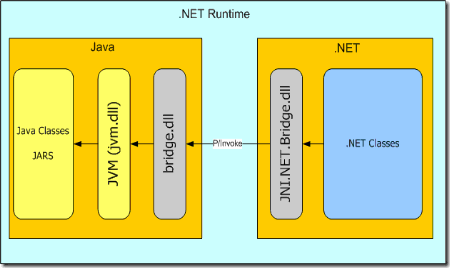
While referring to various web sites for practical options available in  .NET and Java Interoperability,  I came across some info given on code project written by Guy Balteriski. This article talks in depth about various aspects related to .NET and Java Interoperability such as

  1. Part I: Introduction to Java & .NET interoperability and the suggested solution
  2. Part II: Implement .NET proxy to the Java classes
  3. Part III: Using Attributes to extend the Java API solution
  4. Part IV: Java to .NET API calls
  5. Part V: Implement Java proxy to the .NET classes
  6. Part VI: Adding Annotations to extend the .NET API solution

JniNetRuntimeArch

A must see website on this topic is jnbridge.

This MSDN example shows  Java/.NET Interoperability with the Microsoft.com Web Service.

Overall with this frameworks and other options a true blend of interoperability can be achieved between Java and .NET for delivering real time problem scenarios.

Hope this helps !


Diwali '09

Technorati Tags:

In my previous posts we saw important aspects regarding

  1. Interops-Why and Ways to do it
  2. Interops-Win32<->.NET
  3. Interops-COM<->.NET

Moving further into world of interops lets now check some of  interesting aspects of Interlanguage interoperability on .NET framework.

The problems of interoperability have been around for many years and I found this useful info on MSDN which describes number of standards and architectures developed to address this issues

  1. Representation Standards
  2. Architecture Standards
  3. Language Standards
  4. Execution Environments

Representation Standards

External Data Representation(XDR) and Network Data Representation (NDR ), address the issue of passing data types between different machines. ( e.g. big-endian issues, little-endian issues,  and different word sizes)

Architecture Standards

Remote Procedure Call by Distributed Computing Environment

Common Object Request Broker Architecture

Component Object Model

All these standards handle issues of calling methods across language, process and machine boundaries.

Language Standards

ECMA C# and Common Language Infrastructure Standards

ANSI C standards which allow distribution of source code across compilers and machines.

Execution Environments

Common Language Runtime

Dynamic Language Runtime

Referring to CLR info on MSDN we can easily figure out it consists of 3 main components

  1. Common Type System which supports many of the operations found in modern programming languages.
  2. A metadata system, which allows metadata to be persisted with types at compile time and the used by execution system at run time.
  3. A execution system which allows which allows .NET programs execution providing features such as memory management.

Dynamic Language Runtime provides following services

  1. A dynamic type system
  2. Dynamic method dispatch
  3. Dynamic code generation
  4. Hosting API

DLR is used to implement dynamic languages like Python and Ruby on the .NET framework.

There are still interesting aspects to be covered in interoperability and I will be covering it in next two posts. Keep visiting 🙂

Interops – Inter Language Approach

Interops – COM <-> .NET

@Mysore

In my last post I mentioned ,

There are two ways that C# code can directly call unmanaged code:

  1. Directly call a function exported from DLL
  2. Call an interface method on a COM object

In this post lets concentrate on how to call an interface method on a COM object and how this can be implemented for managed environment.

.NET framework provides following facilities to perform COM Interop

  1. Creating COM objects
  2. Determining if a COM interface is implemented by an object
  3. Calling methods on COM interfaces
  4. Implementing objects and interfaces that can be called by COM clients.

Additionally, .NET framework also handles reference counting issues with COM Interop so there is no need to call or implement Addref and Release.

COM Interop provides access to existing COM components without requiring that the original components need to be modified and for this we can use a COM Interop utility (Tlbimp.exe).  Type library importer converts the type definitions found within a COM type library into equivalent definitions in a CLR assembly.

Type library Importer performs following conversions :

  1. COM coclasses are converted to C# classes with a parameter less constructor
  2. COM structs are converted to C# structs with public fields.

Microsoft Intermediate Language Disassembler provides a great way to check out the output of Tlbimp.exe to view the result of the conversion.

In addition to this, COM Interop allows programmers to access managed objects as easily as they access other COM objects Here COM Interop provides a Assembly Registration Tool  that exports the managed types into a type library and registers the managed component as a traditional COM component.

I referred MSDN for following steps and key points are as follows

Creating a COM Class Wrapper

Tlbimp converts a COM type library into .NET framework metadata- effectively creating a managed wrapper that can be called from any managed language.

  1. .NET framework metadata created with Tlbimp can be included in a C# build via /R compiler option.
  2. Using Visual Studio we need to add only COM type library and conversion is done automatically.

Important attributes in understanding COM mapping are

  1. ComImport
  2. GUID
  3. Interface Type
  4. PreserveSig

Declaring and Creating Comcoclass object

COM coclasses are represented as a classes with parameterless constructors  in C#. ComImport attribute is a must for them. Creating instance of this class using the new operator is the C# equivalent of calling CoCreateInstance.

Additional restrictions are as follows

  1. The class must not inherit from any other class
  2. The class must implement no interfaces
  3. GUID for the class

Declaring a COM Interface

  1. COM interfaces are represented in C# as interfaces with COMImport and GUID attributes.
  2. COM Interfaces declared in C# must include declarations for all members of their base interfaces with the exception of members of IUnknown and IDispatch. These are added by .NET framework automatically.
  3. COM interfaces which derive from IDispatch must be marked with the InterfaceType attribute.
  4. When calling a COM interface method from C# code, CLR runtime must marshal the parameters and return values to/ from the COM object.
  5. Common way to return success or failure is to return an HRESULT and have an out paramter marked as “retval” in MIDL for the real return value of method.

Apart from this following are the links, one should must see for        COM <-> .NET interoperability given on MSDN

Introduction to COM Interop

COM Interop Part 1: C# Client Tutorial

COM Interop Part 2: C# Server Tutorial

COM Callable Wrapper

Exposing .NET Framework Components to COM

Advanced COM Interoperability

Simplify App Deployment with ClickOnce and Registration-Free COM

I will be writing few more posts on Interops and some of the interesting aspects discovered using this. Meanwhile, do let me know your feedback and expectations from this blog.

Interops – Win32 <-> .NET

lamp

Technorati Tags: ,

As discussed in my first post , a common scenario where Interops are needed is accessing a legacy code written using Win32 APIs  in .NET applications for various reasons.

There are two ways that C# code can directly call unmanaged code:

  1. Directly call a function exported from DLL
  2. Call an interface method on a COM object

Luckily Platform Invoke (P/Invoke) service provided by .NET framework supports invoking unmanaged code residing in DLLs to be called in .NET environment.

C# provides a mechanism for providing declarative tags, called attributes which can be placed in certain entities in source code to specify additional information. Information contained in attributes can be ret rived through reflection, or one can use predefined attributes.

Use of DllImport can be made as follows in C# for calling MathFuncimportClass from unmanaged DLL.

[DllImport] public class MathFuncimportClass { … }

In addition to this , we can have few named parameters as well as unnamed(positional) parameters.

[DllImport(“user32.dll”, SetLastError=false,ExactSpelling=false)]
[DllImport(“user32.dll”, ExactSpelling=false,SetLastError=false)]
[DllImport(“user32.dll”)]

For a broader look one must have a reading of DllImportAttribute Members

An excellent info on EntryPoint, Charset, SetLastError and CallingConventions is given on Jason Clark’s post on MSDN Magazine. These are all optional properties in DllImportAttribute.

Data Marshaling

While transferring data between managed and unmanaged combination of code , CLR follows number of rules that one must know so as to tackle any tricky scenario.

While passing parameter to a Windows API function important points needs to be considered as follows

  1. Is the data in a form of integer or float ?
  2. Is the data signed integer or unsigned integer ?
  3. Bitwise presentation of integer data
  4. Floating point data and its precision.

Some special scenarios encountered while marshalling are

  1. Marshaling pointers
  2. Marshaling Opaque pointers
  3. Marshaling Text
  4. Marshaling a complex structure.

A detailed explanation for all these four points is here on MSDN Magazine. Figure 4 on this link also describes actual MSIL signature seen by CLR in various cases.

Copying and Pinning

While CLR performs Data Marshaling , it used two options copying and pinning .

1) While marshaling the data, the interop marshaler can copy or pin the data being marshaled. Copying the data will place a copy of data from one memory to another memory location.

Value types passed by value and by reference explains this scenario.

2) Pinning temporarily locks the data in its current memory location, and thus it is kept away from relocating by CLR’s garbage collector.

A clear scenario can be visualized here at Reference types passed by value and by reference

P/Invoke Interop Assistant

For quickly figuring out the P/Invoke signature for Win32 API function PInvoke Interop Assistant can be very useful. This tool assists developers with conversion from C++ to managed P/Invoke signatures and vice a versa.

This tool is available for download on codeplex website.

Interops – Why and Ways to do it

Western Thali

Technorati Tags:

For next few days I intend to write about various aspects of .Net Interops and different scenarios where Interops are extremely useful.

Before moving ahead to interops lets first check out some of the important terminologies in .NET .

Managed Code and Data :

Code developed on .NET platform (e.g. code in C#,VB.NET etc) is referred to as managed code and contains some metadata which is used for Common Language Runtime. ( for more info visit  CLR Team Blog ) Data used by .NET applications is called managed data , since .NET runtime manages data-related tasks such as allocating and reclaiming memory, and type checking.  By default code and data used by .NET applications is managed and while accessing the unmanaged code and data e.g. COM objects we can use interop assemblies which will be discussed in later part of this post.

Assemblies :

A primary building block of .NET application is referred to as assembly. It is a collection of functionality that is built, versioned and deployed as a single implementation unit containing one or more files. Each assembly contains a assembly manifest. Every assembly whether static or dynamic contains collection of data that describes how the elements in the assembly relate to each other. The metadata contained in assembly is needed to specify the assembly’s version requirements and security identity. The assembly manifest can be stored in either a PE file ( an .exe or .dll ) with Microsoft intermediate language (MSIL) code or in a standalone PE file that contains only assembly manifest information.  ( A must see article on assemblies is here  MSDN )

Type Libraries and Assembly Manifests :

A type library declares the classes , interfaces , constants and procedures that are exposed by an application or dynamic link library ( DLL ) . A type library is usually a resource in a program file. It can also be a stand-alone binary file with the extension .tlb or .olb . Manifests also include information about

  1. Assembly identity, version, culture and digital signature
  2. Files that make up the assembly implementation
  3. Types and resources that make up the assembly, including those
  4. that are exported from it
  5. Compile-time dependencies on other assemblies.
  6. Permissions required to run the assemblies to run properly.

For importing information from a type library into .NET application Visual Studio.NET contains a utility called as Tlbimp.exe.  ( more information is given here. )

Why Interops ?

While implementing solutions for various problem statements there is a necessity of invoking features provided by other applications or interaction with APIs provided to invoke important services or features.

Following may be some of the scenarios where interops are required

  1. Invoking Win32 apps in .NET
  2. Invoking COM components in application.
  3. Invoking features of MS Office.
  4. Invoking inter language communication
  5. Invoking features of .NET on other platforms.
  6. Invoking functionality provided by a native code where a conversion process is necessary to translate argument data between managed code and native code.

Ways to implement Interops :

Having seen some of the basic  reasons why interoperability is required , lets see some of the ways these interops can be implemented.

PIAs

Primary Interop Assembly is a unique, vendor supplied assembly that contains type definitions ( as metadata) of types implemented with COM. There can be only one Primary Interop Assembly , which must be signed with a strong name by the publisher of COM type library. A single primary interop assembly can wrap more than one version of the same type library.

Primary Interop Assemblies must meet following requirements

  1. Include all COM types defined in the original type library and maintain the same GUID identities.
  2. Be signed with a strong name using standard public key cryptography
  3. Contain the PrimaryInteropAssemblyAttribute.
  4. Avoid redefining external COM types.
  5. Reference other primary interop assemblies for external for external COM dependencies.

Having a single type definition ensures that all .NET framework applications bind to the same type at compile time, and that the type is marshaled the same way at run time. It is important to create only one primary interop assembly for each COM type library because multiple assemblies can introduce type incompatibility.

There are several other aspects with PIA such as

  1. Naming a primary interop assembly
  2. Generating a primary interop assembly
  3. Customizing a primary interop assembly
  4. Distributing a primary interop assembly

MSDN explains in-depth approach of all these points.

Office XP PIAs can be downloaded here .

System.Runtime.InteropServices Namespace

System.Runtime.InteropServices namespace provide a wide variety of members that support COM interop and platform invoke services.

A detailed description of its classes and structures is given on MSDN which covers all the aspects about using this namespace and is a must read chapter for everyone who wants to cover this concepts in a systematic approach.

Platform Invoke

Platform Invoke services ( commonly referred as P/Invoke) allows managed code to call unmanaged functions that are implemented in a DLL.

Important aspects one must consider while using P/Invoke are

  1. Using Attributes
  2. DllImportAttribute Class
  3. MarshalAsAttribute Class
  4. StructLayoutAttribute Class
  5. InAttribute Class
  6. OutAttribute Class

Java and .NET interoperability

With Restlet lightweight open source project its now possible to use lightweight REST framework for Java that used Restlet extension for ADO.NET Data Services.

More info about Restlet open source project is here

In coming articles I will be explaining all of these ways in detail and resources that one must have a look for covering several effective practices while using Interops. I will also be covering various areas where these interops can be used.

Do let me know all of your suggestions and areas to be covered in this post.

Keep Visiting !!